30 April 2012

Scrappy Monday with My Creative Time: Goofin' Around

by Veronica

Howdy! Today is the very FIRST installment of the new My Creative Time segment dedicated to scrapbook layouts! I really do love to scrapbook, but always seem to find myself creating cards or home decor items. For today's project, I'm adding another page to the scrapbook that documents the Disney World trip my (now) husband and I took in October 2010 (which *cough* still isn't finished).

Confession time: I haven't even THOUGHT about starting our wedding album and we'll be celebrating our first anniversary in June. In fact, the only pictures I have PRINTED from our wedding are those that other people have given me. I know, I know...terrible.

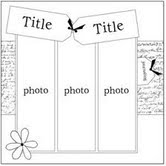
This scrapbook page is 12x12 and is inspired by the following sketch. You'll notice that I didn't use three pictures, I don't have tags in my title, nor did I use any flowers. When following a sketch, you DO NOT have to follow it exactly! The sketch should be used as inspiration - a starting point - for your project. Use your own interpretation of the elements in the sketch and make it your own!

Click photo for larger view
I just love the pictures I took of the Hubs with Goofy in Animal Kingdom. As the journaling block states, I really thought that I would have to convince Duane to pose with the characters for me. But he was all too willing to wait his turn behind all the 5-year-olds and then give Goofy a giant hug and a beaming smile for the photo.

The title of this page was created using Mini Monograms ("Just", "Around") and Mickey Font ("Goofin") Cricut Cartridges. The papers are from various Disney paper pads and the Goofy and camera 3D stickers are from a Disney package purchased at my local Debbie's Dollar.

Want to play along with this Sketch Challenge? Create your layout (it can be ANY size) and link up over at Emma's blog! Can't wait to see what you create!

I hope you were inspired!

- Veronica

26 April 2012

MCT Throwback Thursday: Happy Birthday Flowers

by Veronica

It's another Throwback Thursday over at My Creative Time, and this week's challenge is to create a project using a Cricut cartridge with a frame.

Click image for larger view
For my project, I made a beautiful card for my Grandma who's birthday, May 1st, is just the day after mine! After creating my card base (5.5" square), I adhered my flower patterned paper (from Echo Park's This & That 6x6 pad) and then cut another sheet of the same patterned paper into strips and popped them up over the first layer.

My frame was created using the Elegant Edges Cricut Cartridge and was popped up onto my card. I stamped the flower bunch from Bloom Where You Are Planted and colored it with my Copics. The "Happy Birthday" is from Floral Sentiments - I just LOVE that font!

Of course, I used plenty of pop dots to bring my card to life and I added some Stampin' Up! Baker's Twine for a little extra pizzazz.

If you want to join in on the Throwback Thursday fun, click on over to Emma's blog to link up! You have until Wednesday, May 9th to play along!

I hope you were inspired!

- Veronica 

25 April 2012

We Have A Winner!

by Veronica

It's time to announce the winner from the My Creative Time 16th Edition Release Blog Hop!

Congratulations to....

Veronica (Mommy's Crafty Creations)!

(How coincidental is THAT?!?!)

You've won the 6x6 Echo Park Polka Dots Paper Pad!

Thanks to everyone for your sweet comments!

- Veronica


19 April 2012

MCT April Release Day Blog Hop: Flower Bunch

by Veronica

Click image for larger view
Hello and welcome to the My Creative Time 16th Edition Blog Hop! If you've arrived here from Trell's blog, you're on the right path! If not, I suggest starting at Emma's blog so you can see ALL of the amazing projects the Design Team has in store for you!

As card makers, we are no strangers to creating/sending Thank You Cards. But what if we switched it up every now and then? For today's project, I've created a Thank You Flower Bunch. Using the BRAND NEW Rolled Flower Dies, I created this beautiful (and never dying) bunch of flowers. The Rolled Flower Dies will work with paper or card stock, patterned or solid. To add some oomph to my solid color flowers, I inked the edges with my Tim Holtz Alcohol Ink Applicator. I also glued a little rhinestone to the center of each flower for some extra pizzazz.

Click image for larger view
For the stems, I covered some leftover pipe cleaners I had from another project with white floral tape and stuck them through the bases of my flowers. Then I wrapped all of the stems together with more floral tape. The "Thanks a bunch!" sentiment from Bloom Where You Are Planted worked PERFECTLY with my little bunch of flowers. I stamped that on the large die from Teeny Tag Greetings and tied it to the bunch with Stampin' Up!'s Pool Party Bakers Twine.

***GIVEAWAY ALERT***

Click image for larger view
For our Blog Hop giveaway, each one of the Design Team Members will be giving away an Echo Park "DOTS & STRIPES" 6x6 pad! All you have to do is leave a comment here along with the rest of the design team members' blogs AND also leave a way for me to contact you! Each designer will be picking a winner! So remember you  have LOTS of chances to win!  The deadline is Sunday, April 22nd at midnight!

EASY PEASY!!! GOOD LUCK!

*****************************************************


I am the last stop on today's hop. Thanks for visiting!

I hope you were inspired!

- Veronica


                       Bloom Where You Are Planted
Rolled Flower Dies
                             

18 April 2012

MCT April Release Sneak Peek #3: Wishing You Comfort...

by Veronica

Welcome, welcome to our LAST day of Sneak Peeks before the 16th Edition Release Blog Hop! Today, I'd like to discuss a difficult topic in the craft world: Sympathy Cards.

Click image for larger view
Sympathy cards are difficult to make because we never want to have to make them. But inevitably, we'll need one here and there. I would like to suggest that you make a few sympathy cards to add to your stash. If you find yourself needing to send a card, it will be MUCH easier for you to go to your stash and spend your time writing your comforting words than spend your time coming up with the appropriate card. Also, you'll never be stuck saying, I'll send a card as soon as I make one - and then discover that you just can't find the time right now to do that.

Today's project is a simple, but elegant Sympathy Card that I made using just a few products. After cutting and folding my card base (4.25" x 5.5", fold at the top), I drew a border around the inside using a brown fine tip marker. I stamped the sentiment from MCT's new stamp set, Floral Sentiments (available for purchase tomorrow), and adhered that layer to my card base. I used my paper piercing tool to add a dotted line above the sentiment.

Click image for larger view
The FABULOUS 3D flower is one of two dies on the "double die set", Rolled Flower Dies (also available tomorrow). After gluing my flower together and onto my card, I added a rhinestone to the center to give a bit of sparkle.

Tip: Do you have trouble holding onto rhinestones when you're trying to place them? I've been using 'reverse tweezers' from Making Memories for years for my rhinestones and I still can't see to keep a hold of them. As I was perusing Sally Beauty Supply the other day, I found this great rhinestone tool called PICKerr UPerr that works great!


Sneak Peek Giveaway Time!
With all of our Sneak Peek weeks, Emma likes to do some FUN giveaways!

 ***All you have to do is leave comments on our blogs! You do NOT have to comment on every blog, BUT if you do, you will have more chances to win!

 ***SPREAD THE WORD TO THE WORLD ON FACEBOOK about this release & whatever connections you may have! Let us know on My Creative Time's Facebook page that you did so! OR you can just tag My Creative Time in your post!

Emma will randomly pick & announce all winners on Thursday, April 19th during the Stamp Release Blog Hop happening @ 12:01am PST in her video! GOOD LUCK!

Log onto to your facebook now & let start spreading word!
*************************************************************

Thank you so much for dropping by today and letting me share a difficult topic with you. Please come back tomorrow for the My Creative Time Release Blog Hop!

I hope you were inspired!

- Veronica
17 April 2012

MCT April Release Sneak Peek #2: Happy Mother's Day

by Veronica

Welcome back to Day 2 of April's My Creative Time Release. Today we are showcasing the new Bloom Where You Are Planted stamp set. If you love to color - THIS is the stamp set for you!

Click photo for larger view
This card is 4" x 4" (my new favorite card size) and has just enough room to fit everything I need without leaving me wondering, What am I going to put there?


After laying my patterned paper onto my card stock base, I punched my scallop layer using Stampin' Up!'s Scallop Trim Border and Corner Punches. I stamped the corner flowers stamp from Bloom Where You Are Planted onto my pink square and colored them in with a light pink Copic marker. Once I wrapped my Stampin' Up! Pool Party Baker's Twine around the pink layer, I popped it up onto the scallop layer.

The focus flower was colored with my Copics, cut out, glittered (Star Dust Stickles), and popped up onto the card. I used the "Happy Mother's Day" sentiment from My Creative Time's More Gift Card Sentiments.


Sneak Peek Giveaway Time!
With all of our Sneak Peek weeks, Emma likes to do some FUN giveaways!

 ***All you have to do is leave comments on our blogs! You do NOT have to comment on every blog, BUT if you do, you will have more chances to win!

 ***SPREAD THE WORD TO THE WORLD ON FACEBOOK about this release & whatever connections you may have! Let us know on My Creative Time's Facebook page that you did so! OR you can just tag My Creative Time in your post!

Emma will randomly pick & announce all winners on Thursday, April 19th during the Stamp Release Blog Hop happening @ 12:01am PST in her video! GOOD LUCK!

Log onto to your facebook now & let start spreading word!
*************************************************************

Thanks for stopping by today. Come back tomorrow for MORE Sneak Peeks!

I hope you were inspired!

- Veronica

16 April 2012

MCT April Release Sneak Peek #1: Just a Note

by Veronica

It's Day 1 of the new My Creative Time 16th Edition Sneak Peeks and YOU are in for a treat! Be sure to stop by Emma's blog today to see ALL of the wonderful projects featuring TWO of the newest stamp sets: All Around Everything and All Around Everything Accessories.

Today, I'm featuring All Around Everything Accessories (available for purchase on Thursday). My card is a little 3x3 note card that I can add to my stash of sweet 'forget-me-not' cards that I hide for my husband when either one of us leave on a trip. After adhering my patterned paper to my card base, I colored the adorable little mailbox from this new set with my Copics and stamped it on the Stitched Circle Die which I mounted onto the Scallop Circle Die (both My Creative Time).

I made my own little envelope by cutting a piece of white card stock approx. 1" x 2" and scoring it on the long side at .5" and a little less than 1.5". Then I cut the corners off up to the score lines and folded. Voila!

I popped the envelope up on the card base and used my paper piercing tool to create a little 'path' for the envelope from the mailbox. The sentiment (Teeny Tag Greetings) was stamped onto the Teeny Tag Die and wrapped in Stampin' Up! Bakers Twine.


Sneak Peek Giveaway Time!
With all of our Sneak Peek weeks, Emma likes to do some FUN giveaways!

 ***All you have to do is leave comments on our blogs! You do NOT have to comment on every blog, BUT if you do, you will have more chances to win!

 ***SPREAD THE WORD TO THE WORLD ON FACEBOOK about this release & whatever connections you may have! Let us know on My Creative Time's Facebook page that you did so! OR you can just tag My Creative Time in your post!

Emma will randomly pick & announce all winners on Thursday, April 19th during the Stamp Release Blog Hop happening @ 12:01am PST in her video! GOOD LUCK!

Log onto to your facebook now & let start spreading word!
*************************************************************

I hope you were inspired!

- Veronica

12 April 2012

MCT Stamp of the Month: Camera Shy

by Veronica

Hey there! If you haven't already heard on Emma's blog, starting today you can order Camera Shy, one of the two Stamps of the Month at a discount! How great is that?

Click photo for larger view
This set is perfect for adding just a little bit of oomph to your photo frame projects. This photo was taken at my Bridal Shower last April. I just love the 'candid' shot as I turned around to look at the photographer (my brother) while my (now) husband was talking with guests. Having a photographer for a brother has taught me one important thing: When someone calls your name from behind you, turn around with a smile! You never know if there will be a camera in your face! *giggle*


Click photo for larger view
To add some flair to this photo, I stamped the sentiment from Camera Shy and the heart from My One and Only onto a piece of white card stock which I mounted onto my patterned paper. All that was left to do was make it SPARKLE! I did that by gluing individual teal Jolee's Swarovski Crytals to the photo. Voila! Just a little spice to make this photo more than just another picture in a frame.

I hope you were inspired!

- Veronica