25 October 2011

2011 Halloween Door Wreath

by Veronica

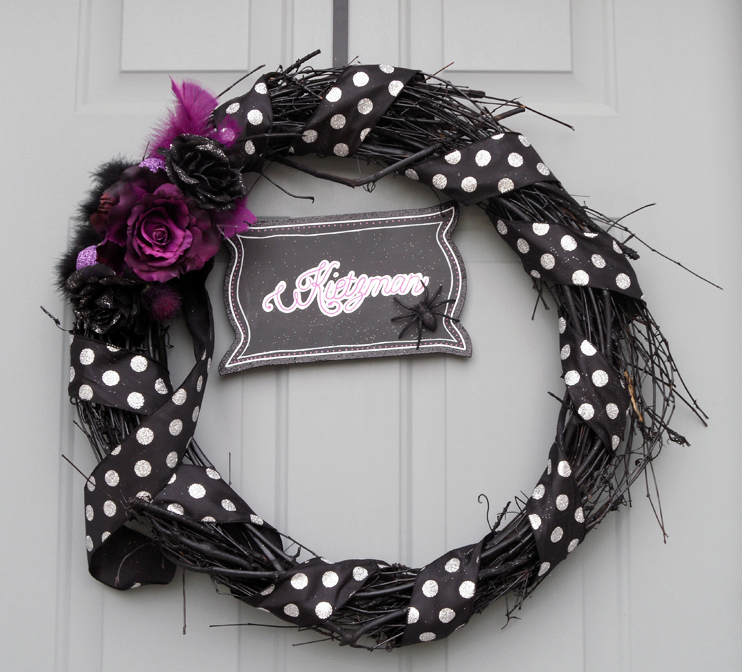
I don't have a pretty front door. Some people do. I'm not one of them. It's gray, drab - blech. A great way to add some flair to an otherwise boring front door is to add a wreath - and they're not just for Christmas anymore!

I went to my local craft store and found a 24" grapevine wreath for $7.99. After pairing it with my handy 40% off coupon, I walked out as the new owner of a wreath for just $4.79 + tax! I knew that the brown color wasn't going to give the effect I was looking for, so when I got home, I laid some newspaper down in the garage and gave the wreath a good coat of black gloss spray paint. It doesn't have to be perfect!

Once it was dry, I brought the wreath up to my Creative Studio to start adding the accents. I have a tendency to go a bit overboard with accents, so I tried my very best to keep it simple and classy. I added some black maribou feathers, purple craft feathers and black and purple roses to start. Then I popped in a couple purple glitter balls (read more on that here) and wrapped the wreath in a fun polka dot wired ribbon.

The sign was a great find at Michael's! It was clearance for $1.99 - so I picked up two (you can see how I used my other sign in my Outdoor Decor). It was originally hung vertically, so I used my Crop-a-Dile to punch two new holes to hang it horizontally (I LOVE my Crop-a-Dile! It will punch a hole through almost anything!). I used Sharpie Poster Paint Markers in white and purple to write our name and border the sign. Believe me - my handwriting is NOT that good! I printed out our name in a font I like on my computer, cut it out, traced it onto the sign with pencil, and then filled it in using the markers. It was not a quick process, but I really love the way it turned out! In one day, I brought my front door from drab to FAB!

Stop by tomorrow for some inexpensive indoor Halloween decorating ideas!

24 October 2011

2011 Outdoor Halloween Decor

by Veronica

This is my first time really decorating for Halloween. A couple years ago, I threw some fake spider webbing over our very dead tree ON Halloween Day, but this year - I actually put thought into our Halloween decorations.

I started out by simply placing two pumpkins on our front porch. That was fine for a couple days, but something was definitely missing. So I took a trip to my favorite store - Salvation Army - and found some AWESOME goodies!

I noticed a small hay bale in the shop window, but decided to go over into the "Brick-a-Brack" section first. And what do you know? Another hay bale! I checked out the price: $1.99 - can't go wrong! So I picked it up and high-tailed it back to the front window to get the other bale. It was marked at $4.99, but the manager said he'd give me the $1.99 price. In the basket it went!

I also found this great black urn that was not-too-big, not-too-small for $4. I knew it would make a great addition to my front porch if I just added some spooky flowers (of which I had some leftovers at home from other projects) and black river stones (left over from my June wedding centerpieces).

After a bit of moving things around, I'm really happy with the way it all came together. It's not too spooky and is a very nice welcome for visitors (and Trick-or-Treaters)! I love that I'll be able to re-use the hay bales for my Fall Decor and I'm sure I'll find something to do with that black urn throughout the year!

Another great find I got from Salvation Army was this white plastic picket garden fencing. I knew exactly what I was going to do with it when I saw it and the $.99 price for 3 pieces was a total bonus!

I took it home and got out my hack saw! I sawed away at each piece creating broken slats - a really spooky look. After it was all broken up, I inked up my Tim Holtz Distressing Tool with Antique Linen Distress Ink and went to town! I knew Antique Linen wouldn't be enough, so after letting each piece dry a bit, I distressed them again with Walnut Stain.

Little trick: After you've finished inking up the plastic, use your heat tool to set/dry the ink. Be careful and don't get too close or you could melt the plastic!

Now that my fence was dirty-looking and spooky, I was ready to create my own personal Garden Cemetery! I had a few tombstones from a couple years ago, so I stuck them in my (very sad) garden by the front porch.

This is where I make my confession: Hi, my name is Veronica and I'm a terrible gardener. 


It seems that dying/dead plants and weeds really add to the effect of a Spooky Garden Cemetery, so I'm going to pretend like that was my plan the whole time. I MEANT for my garden to look awful so that it would be PERFECT for Halloween. Yep. That's my story.

It's been super windy here for the last little while, so I filled sandwich bags with rocks and placed them on top of the stakes that keep the tombstones from blowing over backward. That seems to be helping as I haven't lost a tombstone yet!

I tossed a couple furry spiders into my Hostas and hung a BEWARE sign on the broken fence.

Our front porch/walkway area is now ready for Trick-or-Treaters! Check back tomorrow for a look at my Halloween Door Wreath!