06 July 2015

MCT Scrapping the Little Things: Bridal Party Wedding Layout

by Veronica

Now that I've got a baby book to get started on (soon), I'm happy to be finishing up my wedding album (finally)! I have most of the important pages done and am just filling in the album with more fun photos. 

I already have pages for the bridesmaids and groomsmen, but our photographer took such great photos after our ceremony out on the golf course - I didn't want to leave some of these shots out of the album!

MCT Products Used
Uppercase Fun Dies ("Bridal")
Let's Celebrate ("Party")
Wishing You Both the Best (small heart die)

Of course, as I added this layout to my wedding album, I had to go back through all of the pages and started crying. These darn pregnancy hormones have made me quite emotional lately. I cry at Pampers commercials!

Speaking of the baby... if anyone is wondering...


It's a boy!!!

Thanks for stopping by today. You can see more projects for Scrapping the Little Things on Emma's blog.

I hope you were inspired!

- Veronica

27 October 2014

MCT Scrapping the Little Things: Mom & Me Wedding Layout

by Veronica

I'm plugging away on my wedding album. It's only be three-and-a-half years in the making. Progress is progress, right?


The MCT Design Team was asked to use a sketch (found on the MCT blog) for our layouts today. This layout is of my mom and me. Can you tell we're related?

MCT Products Used
Build A Pretty Flower (flower stamps)
Pretty Spring Wreaths (yellow dots stamp)
Build A Scripty & Watercolor Background (script stamp)

Thanks so much for dropping by today. Mosey on over to Emma's blog to see what the other designers have in store for you.

I hope you were inspired!

- Veronica

01 September 2014

MCT Scrapping The Little Things: Love Wedding Layout

by Veronica

Hello there! Today at My Creative Time we're using a sketch for our scrapbook layouts. This one was a lot of fun for me. I've always loved the look of mostly 'bare' pages with a bold main focus - and this page is just that!

To create the 3" x 3" photo squares, I used the Stitched 3x4 Journal Die. After cutting out the photo first, I then re-positioned the die to cut the photo again at a smaller length. It was kind of the opposite of lengthening a die.

MCT Products Used
Family Is Everything ("love" die)

Thank you so much for stopping by today. Be sure to see what the other designers have created for today on Emma's blog.

I hope you were inspired!

- Veronica

04 August 2014

MCT Scrapping The Little Things: Happy Feet Layout

by Veronica

For today's Scrapping The Little Things at My Creative Time, we were challenged with creating a layout using a sketch. I'm still plugging away at my wedding album and knew that I wanted a page to feature The Hubs' and my footwear.


The title is made of all MCT dies. A lot of MCT dies have layers, but for those that don't, you can make your own by simply cutting the die out in two colors and off-setting them like I did for "Happy".


MCT Products Used
Happy Thoughts ("Happy")
Lowercase Fun Dies ("feet")
Girls' Night Out Stitched Dies (high heel)
Stitched Bracket Dies (bottom edge of journal layer)
Stitched 4x6 Journal Die (side edges of journal layer)

Thanks for stopping by to see my Happy Feet layout. The other designers have fabulous pages for you to check out on the MCT blog.

I hope you were inspired!

- Veronica

21 July 2014

MCT Scrapping The Little Things: Wedding Ceremony Layout

by Veronica

Bit by bit I've been working on my wedding scrapbook. We've been married for 3 years now, so while I'm definitely not on top of things, it's coming along.

The designers were challenged to use a sketch for today's post, and I think I may have cheated a little. No surprise there. I've used part of the sketch on one page and part of the sketch on the other page.

Since I like to justify when I cheat, I'll point out that I did create two pages, so since I did extra work, the judges should be lenient with their ruling. Obviously, I've been watching too many lawyer shows.

This double-layout features my wedding ceremony from June 2011.

Fun fact: Like many women, I had dreamed about my wedding for as long as I could remember and there were a few minor details that I made sure the pastor was clear on...
  1. I wanted to say "I do" during our vows, not "I will." He even changed the wording of his 'script' to make sure that happened.

  2. I wanted him to tell my new husband to kiss "his bride", not "the bride."
Silly to some, yes. But these little things were so important to me.


The first page shows the actual ceremony being held. I included a program on the page to remember the order of the service. For those of you wanting the full experience, feel free to listen to Canon in D when viewing these pages. Ha!


For the second page, I kept it very simple and let our first kiss as husband and wife tell the story. I used the "&" from And Then Some and letters from Lowercase Fun Dies to make a statement. I cut each die out twice: once in its designated color and once in white. I then layered the white die cuts behind the colored/patterned versions to create a shadow. It really helps the letters to pop.

Thank you so much for stopping by to relive a bit of the happiest day of my life with me. You can see other fabulous scrapbook layouts on the MCT blog.

I hope you were inspired!

- Veronica


23 January 2014

MCT Designer Challenge: Sketch!

by Veronica

Hey there! Today My Creative Time is hosting a scrapbook layout Sketch Challenge, so I created a new page for my wedding album - and it's all about CAKE! Yum!


This layout somewhat follows the sketch posted on the MCT blog. I definitely took some creative liberties with it, but I think that's kinda the point - make it your own! The cake was hand-cut (very simple) and then embellished with embossing folders, rhinestones and Stickles. I used a few MCT dies on my page: Stitched Sweetheart & XOXO Dies, 4x4 Journal Die, Lowercase Fun Dies. For the "you take", I used two different stamps from Treasured Moments - inking only the words I needed and stamping them side-by-side.

Here's a close-up of some of the page:


I'd like to take a moment to point out my face in the second photo and defend myself. I realize that I look mean and angry in that photo, but let me explain. My husband had just lovingly placed delicious wedding cake in my mouth. I, on the other hand, couldn't pass up an opportunity to smoosh just a wee bit of cake in his face. As I did this, I started to laugh - but I still had cake in my mouth. The demon-ish look on my face was my sad attempt at trying to keep my mouth closed while it was full of cake and I was laughing. Since you and I are such close friends, I trust that you'll keep this photo between us. *wink wink*

Thank you so much for stopping by and letting me share with you today. You can see how the other designers interpreted the sketch on the My Creative Time blog.

I hope you were inspired!

- Veronica

04 November 2013

MCT Scrapping the Little Things: Corktown 5K

by Veronica

I have been just cruising along in my Running Smashbook lately! This layout combines the Corktown 5K we ran in March with a page filled with my favorite running quotes and sayings.


Since the Corktown 5K was St. Paddy's Day themed, the rainbow papers were perfect! I used green and orange card stock to keep with the theme and added the "Treasured Moments" sentiment from the Treasured Moments stamp set. (Get it? Treasure... Like the gold at the end of the rainbow?)

FABULOUS was already on the page on the right. Instead of covering it up with paper, I decided to just write around it (and inside of it) for a more personal touch. I'm not a big fan of my handwriting, but it's mine. These are just some of the sayings that keep me motivated to hit the pavement.

Be sure to check out what the other designers have in store for you today on Emma's blog. And you WON'T want to miss Emma's HUGE announcement here!

I hope you were inspired!

- Veronica

30 September 2013

MCT Scrapping the Little Things: Races of 2012

by Veronica

So there I was: sitting at my craft table, staring at the photos of the races I ran in 2012 thinking, I have to make an entire PAGE for each race? But I only have one photo each... And then it hit me. Why does each race need its own page? There are no rules to this.

So instead I created a 'map' layout of all of the 2012 races ordered chronologically. Little arrows guide you around the layout. I wrote small descriptions of fun facts about each race: who ran with us, what happened, what my favorite part was, etc.


MCT Products Used
You Are Here (arrows)
Label Font ("2012")
Type Calendar ("June 30")

Thanks for stopping by today! Be sure to check out Emma's blog to see what the other designers have for you.

I hope you were inspired!

- Veronica

02 September 2013

MCT Scrapping the Little Things: Smashin' 2012

by Veronica

I'm not sure if I'm "Smashing" the right way, but I'm having fun! (and I don't think there is a right or wrong way anyway)


Today's Smash layout is the 'title page' to my 2012 race 'section' in my new Smash book. Sometimes, separating a scrapbook into categories is just what it needs to flow nicely and not let the 'reader' get lost.

The quote on the left has been a favorite of mine since the day I saw it. When I'm having a rough run, I remind myself that today - I CAN do this. During our half-marathon this last July in Chicago, a spectator was holding a sign with those words and yelling out, "Maybe tomorrow! But NOT TODAY!" She really motivated the two friends I was running with and myself to keep on keepin' on.

MCT Products Used
Sports Sentiments ("Dedication+Motivation..." & "I {heart}")
You Are Here (little runner)
Things I Love ("DETAILS")
Stitched 4 x 6 Journal Dies ("2012")

I'm still getting used to using my handwriting - I'm not a big fan of it. But I know that it adds a personal touch to my pages. And since I'm "Smashing", I keep telling myself that it's not supposed to look perfectly put-together.

If you love the motivational quote on the left page as much as I do, feel free to download this FREE printable I created for my page and use it as you wish. I hope that it can motivate you to keep striving for your own goals!

Thanks for stopping by today! You can head over to Emma's blog to see what some of the other designers have created for today's Scrapping the Little Things.

I hope you were inspired!

- Veronica

29 August 2013

MCT 26th Edition Sneak Peek: Smashin'

by Veronica

Have you "Smashed"? This is my first time. I didn't think I was interested in trying it until I found a bunch of Smash stuff on clearance. And if you know me personally, you know I can hardly resist a clearance!

I started paper crafting as a scrapbooker, but I've always had trouble with the organization part. Don't get me wrong, I'm actually quite organized. It's the organization of the book itself that frustrates me. Do I put like pages together? Should the book be chronological? Can I scrap this if I haven't scrapped that yet? It's a raging battle in my head - so I usually stick to cards.

But I've been wanting to document my running journey and I figured a 'quick and dirty' way to do it would be to Smash. I don't have a ton of photos of our races, but I have at least one from each. Plus I have our bibs (the number you wear when you race) and some other memorabilia. Of course, when I decided to Smash my running stuff I was faced with the dilemma: Where do I start? As The Sound of Music says, the very beginning is a 'very good place to start', so I decided that would do just fine.


On the left page, I've featured the new Photobooth Die from My Creative Time. It's the perfect little photo strip that allows you to use any tiny pictures you have in a fun way.

MCT Products Used
Photobooth Die
3x4 Stitched Journal Die
Journal It! Stamp Set ("Details" card)
Stitched Round Speech Bubble Dies
Fly Away With Me Dies (clouds)
You Are Here Stamp Set (little runner)
Things I Love Stamp Set ("Never give up!", "You got this!")
Stitched Tab Die


I have to admit, it was difficult for me to just 'Smash' everything on the pages. The Hubs said it's still pretty organized; I guess it's just in my nature.

click for larger view
Sneak Peek Giveaway
***********************************************
We will be giving away the set we are showcasing each day to ONE
lucky winner! Today's winner will be announced tomorrow on Emma's blog. ALL you have to do is leave a comment on each of the Design Team members' blogs! You are NOT required to comment on EVERY SINGLE blog, but the more you comment on, the better chance you have for winning!

For EXTRA entries, you can spread the word about this release on Facebook, Tweet about it OR even Instagram it! #mycreativetime!

GOOD LUCK EVERYONE & let's start spreading the word!
***********************************************

Don't forget that you can start pre-ordering this release TODAY!!! Head on over to the My Creative Time Shop to start ordering! Be sure to use code AUGUST2013 to save 20% on your entire order through September 6th!

Thanks for stopping by today! Head on over to Emma's blog to see what my DT sisters have up their sleeves for you.

I hope you were inspired!

- Veronica

17 June 2013

MCT Scrapping the Little Things: Father of the Bride

by Veronica


It's not often that I'm wiping tears away as I write up a blog post. But today is pretty special.

Two years ago today, I married my very best friend. Our wedding day was not without a few interesting moments (such as not being able to find my Mom and then being told she was outside... mowing my lawn. {She wanted it to look its best for pictures *giggle*}), but despite not having the proper flavor for the top tier of our wedding cake (see below) and any other hiccups, the day was perfect.

I've been looking through our wedding album today (or at least, what I've completed so far) and read through the letters we wrote to each other to read before walking down the aisle (hence the tears). Maybe one day I'll share the page that holds those letters. But for now, in honor of our 2nd anniversary and of yesterday being Father's Day, I'd like to share my Father of the Bride layout.


I used several different chipboard letter sets to create the title on this layout. I hand-wrote "the" myself.


I just love the way the banners turned out at the top of the second page. I drew inspiration from fellow DT member, Katie's, Banner Graduation Card for that. Even though the main background patterns on the two pages aren't the same, using similar colors really tie them together.

MCT Products Used
Build a Banner Kit (banners)
Chocolate Greetings Stamp Set (banners)
Vintage Stitched Label Dies (banners)
Just Simply Live Stamp Set (banners)
Stitched Journal Die (journaling card)
Journal It! Stamp Set (lines/banner on journaling card)

Thank you so much for stopping by today. Be sure to check out what the other designers have in store for you at Emma's blog.

I hope you were inspired!

- Veronica

P.S. While our guests were served Pineapple Mandarin Orange European Torte for dessert (a fancy and DELICIOUS cake), the wedding party was supposed to enjoy Tiramisu (the top tier of the cake). Unfortunately, the bakery made a mistake and we all had the Pineapple Mandarin Orange. It wasn't a big deal, of course and the bakery offered us a free Tiramisu Torte to pick up whenever we wanted. We decided to wait to have the Tiramisu until our first anniversary and make it a tradition. So today, I'm picking up our Anniversary Tiramisu from the same bakery to help us celebrate!

10 June 2013

MCT Scrapping the Little Things: Maid of Honor

by Veronica


You've probably heard me talk about my BFF, Stephanie, before. If you haven't, let me quickly catch you up to speed: she's pretty amazing. 

Two years ago, I was blessed to have her as my Maid of Honor. This page is for her. 


I used a few different Stampin' Up! patterned papers and card stock on this layout. My Cricut cut out the "maid of honor" title and I accented the "o"s with some pearly brads. 

The "captured" and "Lovely" (from MCT's Life is Good stamp set) were stamped in Versamark and embossed in black and white embossing powder on vellum.

This is page one of a two-page layout. The second page isn't finished yet. I'd like to have Stephanie hand-write her MOH speech around a photo of us on my wedding day on that page. It will be something special that I can treasure for years to come.  

Be sure to check out what the other designers have created for today over at Emma's blog

I hope you were inspired!

-Veronica

25 March 2013

MCT Scrappy Monday: Bridesmaids Layout

by Veronica


Have you seen the movie, Bridesmaids? It is on my top Top 3 Most Hilarious Movies list. Now, I'm sure that the timing of when this movie came out has something to do with how it 'struck a chord' with me. The movie came out in May 2011; I was married a month later.

Bridesmaids from left to right: Christina, SIL; Amanda, SIL; Stacey, Sister; Kim, SIL; Stephanie, BFF; Jen, SIL


You might have seen a few layouts I've created for my wedding album (it's not finished yet and I'd like to re-iterate that I was married almost two years ago. I know, I know... I'll get on it). This one is dedicated to my very own bridesmaids.

A few weeks before the wedding, several bridesmaids, my Mom, Grandma, and (now) Mother-in-Law took me to the theater to see Bridesmaids and we had a blast! When creating my layout, I decided to pay homage to the movie by using my favorite quote, "You are more beautiful than Cinderella. You smell like pine needles and have a face like sunshine". I figured it summed up my girls quite nicely. *giggle*

So many Cricut Cartridges were used on this layout (I used My Cut Search to find cartridges that would have the words I was looking for and pieced the quote together, ransom note-style). And to be honest, while making this layout, I didn't write down all the cartridges I used. Some words were part of other phrases, some were stand-alone and others are just made using alphabet cartridges.

Don't be afraid to mix lots of fonts on your pages. It adds such a fun touch!

Not a lot of stamping was done on this layout - I saved it only for the little banner on the first page and the movie title at the bottom of the second (MCT's Just Simply Live stamp set).

The jeweled accents were hand-set and the white, sparkly "BRIDES" and pink "pine" & "like" are chipboard letters. I used some Star Dust Stickles to add more sparkle to the quote.

This is definitely a busy layout - but every once in a while - I like a little 'busy' *smile*

Thanks for dropping by today. Check out Emma's blog to see what the other designer's have up their sleeves for you.

I hope you were inspired!

- Veronica

04 March 2013

MCT Scrapping The Little Things: Wedding Prep Layout

by Veronica


Welcome back to another installment of Scrapping the Little Things. Last week, I cheated and shared a home decor 'layout'. But this week, I'm right on task!!! In fact, I've tried to make up for last week by sharing a TWO-PAGE layout this time! *giggle*

Almost two years ago, I was lucky enough to marry my very best friend. After more than 8 years together, we finally 'tied the knot'. This is a layout sharing some of the 'prep-work' that went into making me look my best on that special day. C'mon, folks. I don't wake UP that gorgeous! *giggle*


The layout itself is quite simple to really showcase the photos taken by our amazing photographer. There are a few special mementos on the page: lace that 'hung' my dress on the hanger, silver cord that tied onto the box my jewelry came in.


I used MCT's Cherish This Moment to highlight a few of my favorite photos on the pages. Some black studded brads and a silver sparkly bookplate (turned vertical) reminded me of buttons on a tuxedo shirt and adds a little interest.

Thanks for stopping by and letting me share today. Check out Emma's blog to see what the other designer's created.

I hope you were inspired!

- Veronica

25 February 2013

MCT Scrapping the Little Things: Flower Friends

by Veronica


It's Monday and today we are 'Scrapping the Little Things" with the MCT Design Team.

I'm not much of a scrapper these days. I have several books started, but find it hard to stick with it. So instead of scrapping a page for a book, I decided to share a layout that I'm using as decoration in my home. Is this cheating?


Our challenge this week was to use dies from the new Stitched Chunky Jar Dies in this month's release. Since I didn't have much use for an actual jar in this project, I turned mine into a vase of flowers. The sentiment works perfectly with this photo of my BFF & Maid of Honor, Stephanie and I on the biggest day of my life (so far).

Side note: I have to admit that when I look at my wedding photos, I don't see myself anymore. That was 58 lbs ago!

MCT products used
Stitched Chunky Jar Dies
Vintage Stitched Label Dies
Rolled Flower Dies
Floral Sentiments Stamp Set

Some rhinestones and the Chevron Impressions Folder from Stampin' Up! add a bit of oomph to this project.

Thanks for stopping by today. Click over to Emma's blog to see what the other designers have in store for you. I bet they didn't cheat. *giggle*

I hope you were inspired!

- Veronica

22 October 2012

Scrappy Monday: Smashing Sisters

by Veronica


Have you ever "smashed"? This is my first time.

In fact - I admit that I actually had to Google "Smashbook" to really get a handle on what this new (to me) trend actually is. After watching the fun little video, I realized that it is just what it claims to be. A book that is smashed together.

But is it really that easy? Yes and no.

Yes: You really just have to slap a bunch of stuff on a page. There's no rhyme or reason. It doesn't have to match. The stuff doesn't really have to have anything to do with each other. That's the beauty of it.

No: When K&Company 'smashes' stuff on a page, it looks trendy and artsy. When I slap stuff on a page, it looks messy and cluttered. Or does it?

After creating my page, I brought it to my husband and asked, "Does this look 'smashed' together...but still not embarassing?" We are our own worst critics, I guess.

Click image for larger view
My page is 8.5" x 11" and features photos of the "McCollum" Girls. There's me on the left (about 50 lbs heavier); my sister-in-law, Christina; my sister-in-law, Kim; and my sister, Stacey. When we all get together, a good time is guaranteed!

On my page, I used My Creative Time's Cherish This Moment ("A day to remember...", hands and journaling lines) and Just Simply Live ("Treasure this!", arrows, Polaroid & sentiment die). I also used the Rolled Flower Die on top of a couple pink fabric flowers and embellished with a fun brad from Echo Park's This & That embellishment pack.

The pink rhinestones (Debbie's Dollar find) point your attention to the 'labels' I gave each of the girls. I also added a few extra flowers, some zebra ribbon and tiny mirrors for some added flair.

To be honest, I'm really not quite sure how I feel about Smashbooking. I'm more of a 'stay between the lines' kinda gal. But it was fun to play with!

Thanks for stopping by today. Please check out Emma's blog to see what the other designer's created for today's Scrapping the Little Things.

I hope you were inspired!

- Veronica


10 September 2012

MCT Scrappy Monday: Engagement Layout

by Veronica


When my (now) husband proposed to me in December 2010, I couldn't WAIT to get started on our Engagement photos! Having a photographer for a brother, I've always loved having him come over to do a photo shoot for nothing more than a free meal. *giggle*


Click image for larger view
As a graphic designer myself, I was thrilled to be able to create my own Save the Dates using the photos my brother took of us in our home. (Even better is that my Father-in-Law is a printer - so all of our stationery was printed 'on the house'.)

For my Engagement Layout, I started with a white 12 x 12 piece of card stock for the base. Most of the scrapbook pages I create have one or two photos on them and a LOT of embellishment. With this page, I decided to make the photos the star.

The 'word' layer is a full 12 x 12 piece of laser cut card stock. I cut the word "ENGAGEMENT" out of one sheet and popped it up onto the same word on this layer.

I used the Elegant Edges Cricut Cartridge to cut the pretty shape behind the Save the Date and hand set all of the rhinestones into a fun pattern. The fabric flowers (local Debbie's Dollar find) were topped with a brad from the This & That embellishment pack by Echo Park.

Underneath the "ENGAGEMENT" title, I popped up the banner and sentiment from MCT's My One and Only. To finish off the project, I added mini mirrors to the bottom of the page.

Be sure to head on over to Emma's blog to see what she and the rest of the designers created for today's Scrappy Monday.

I hope you were inspired!

- Veronica

19 July 2012

Mickey's House

by Veronica

Whenever I go to our semi-annual "Scrap Camp" with the gals in my family, I notice that my sisters-in-law, Mom and Grandma usually have several pages done while I'm still working on my first. Of course, the fact that I do more chatting than scrapping comes in to play here, but even when I am being productive, it just seems to take me much longer to finish a page than the rest of the girls.

This is why. *giggle*

Back in October 2010, my husband and I were lucky enough to be gifted my grandparents timeshare in Florida. Since we were as close to Disney World as we'd be for a long while, we decided to 'drop in' and visit Mickey and Friends for a couple of day trips.

We had a lot of fun touring Mickey's house! It's so neat that you can actually go inside and see how he actually lives! *giggle*

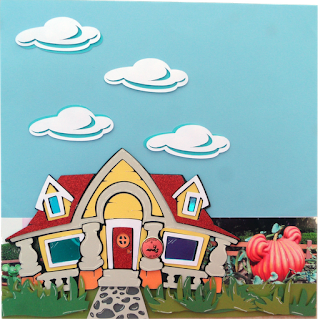
This layout uses Mickey's house, grass, walkway and clouds from the Disney Mickey & Friends Cricut Cartridge. I used several solid and glittered card stock to really make the layers come to life. Several layers are popped up to add dimension. I used my white gel pen to doodle on the trim and columns.

Since we were visiting Mickey in the Fall, the gang was hosting a Pumpkin Contest and several Mickey Mouse Pumpkins were growing in his yard. I placed the photos of Mickey's backyard behind the paper house to give the illusion of them growing on the page.

Of course, I wanted to share photos of Mickey's house in my scrapbook, too. But I didn't want to take away from the 'house' page. Since I had several photos to share, but not all of them were super important, I decided to layer them and make a collage. This technique wouldn't work for all topics/photos, but it certainly does the trick here.

You'll notice that all of my photos have a white trim. This is on the photos themselves. Did you know that when having your photos printed, you can usually choose to have a border put on them? I think the white border gives the photos a more 'professional' feel and I really love the look.

Thanks so much for stopping by today! I'm looking forward to sharing my last Cricut project for my Guest Designer Week at Everyday Cricut with you tomorrow.

I hope you were inspired!

- Veronica

17 July 2012

Transition Scrapbook Pages

by Veronica

Scrapbooks have come a long way since the days of white pages with black photo corners, haven't they? But the concept remains the same: preserve photos, preserve memories.

I love to preserve my snapshots just as much as the next scrapbooker, but sometimes - a photo just isn't necessary. Throughout my scrapbooks, I like to take a break from the photos and insert 'transition' pages, if you will. These special pages allow me room to get creative with the entire canvas - no arranging the layout around photos.

Don't get me wrong: I scrapbook for the photos and memories. But every once in a while, it's nice to design freely.

Click photo for larger view
This 'transition' page was created to go between my engagement pages and wedding day pages in my wedding album (...which I am just now starting. And that's okay!). It serves to let the admirer know that we're moving from one section to another in the book.

The "K" was cut using the Tie the Knot Cricut Cartridge. I used my white gel pen to doodle around the letter (leaving the swirl blank). Well... I meant to leave the swirl blank.

Confession: I got a little carried away with my doodling and accidentally doodled on the swirly part between the legs of the "K" (now hidden by the flowers and tag). It'll be our little secret, okay?


The mistake-cover-up - *ahem* - I mean, fully intentional flowers are by Kaiser Scrapbook and were purchased from my local Debbie's Dollar Store (the BEST dollar store...possibly ever). I layered the different colors together, added the tag (from the Echo Park This & That Decorative Brads set) to better hid my doodle-oops and held it all together with a coordinating brad from the same Echo Park set.

The green layers on the page were hand cut and I paper pierced the top piece. Our wedding date was cut using the Stamped Cricut Cartridge. I tied some Stampin' Up! Pool Baker's Twine around the date layer to add a little texture.

This page really sets the tone for the wedding section of my album. And I urge you to consider adding 'transition' pages to your scrapbooks, too!

I'll be back tomorrow with another Cricut project to share here and on the Everyday Cricut blog.

I hope you were inspired!

- Veronica

31 May 2012

MCT Favorite Stamps of the Month

by Veronica

Howdy! Welcome to the latest installment of Emma's Favorite Stamps of the Month! For the month of June, THREE stamp sets will be on sale at the My Creative Time Online Store: You're My Best Buddy (just in time for Father's Day), My Little Firecracker (perfect for your Independence Day projects) and Have Fun in the Sun (great for your summer layouts and cards).

click photo for larger view
My project today uses Have Fun in the Sun in a bit of a non-traditional way. In fact, the whole layout is a bit different.
Most scrapbook pages are expected to have photos on them. But every once in a while, I like to create a page that sets the mood for the pages following it. This "title" page is for my Disney World album (that I'm still working on a year and a half later... *cough*).

I used the Alphalicious Cricut Cartridge to cut out my letters and shadows (except for "Disney", which was cut using the Mickey and Friends cartridge). The arrow was cut using the Accent Essentials cartridge. To add some visual interest, I 'threaded' the "O" and "D" with the arrow.

The little Mickey and Minnie driving away in the car was hand cut out of a piece of paper (found at my local Debbie's Dollar Store). I stamped "Magic" from Have Fun in the Sun and cut it out in a rectangle to make the Mouse's license plate.

If you're interested in playing along, you can link up your project using any of the three "Favorite Stamps of the Month" on Emma's blog!

I hope you were inspired!

- Veronica