29 August 2012

MCT 3-D Wednesday: Birthday Banner Cake

by Veronica

As the resident baker of my friends and family, I love to try fun new ways to 'dress up' my sweet creations. I usually stick to cupcakes: they're quick to bake, easy to frost and yummy to eat! But sometimes, I feel fancy and decide to bake an actual cake.

Click photo for larger view
This cake was baked with so much love for my best friend, should-a-been-sister, former manager, college lunch mate, maid of honor, Stephanie. She turned the big 2-8 this year and we celebrated in style!

As you've probably noticed, banners are a HUGE trend nowadays. You can find them everywhere - even on baked goods! As I was baking this cake, I knew I'd put a banner on it - there was no question.

After baking and stacking my cake...

Confession time: I use boxed cake. Pretty much always. Ms. Crocker and Mr. Hines have come a long way since I was little. Their cakes are not only delicious, but save me time. I'd rather spend my time decorating than measuring ingredients. I give major kudos to you 'from-scratch' bakers, but I'm not ashamed to admit that I stand behind my boxed-creations. Can I get an 'amen'?

...so, after I baked and stacked my cake, I started frosting. I do make my own frosting, but it's so easy to make that it almost doesn't count as being 'from-scratch' (find recipe below). I knew I didn't want my frosting to be smooth. I wanted more of a homemade/vintage look to the cake. (I also didn't want to end up in tears because I couldn't smooth the frosting well enough - it's happened. *giggle*) Once my cake was frosted and the edges of the cake board were piped, I moved on to making the banner.

The banner flags were cut using My Creative Time's Build A Banner Kit. I stamped the HAPPY letters from Anyday Bingo & Crossword and used pop dots to adhere the banner pieces together. I then stamped "birthday" from the "Happy Happy Birthday" sentiment in Wow So Many Candles and hand-cut it into a trapezoid shape. The top of that shape is adhered to the bottom of the last banner flag.

I used an anywhere hole punch to poke through the top of each banner flag twice and strung linen thread through each hole. The thread is then stuck into slits in the skewers to hold the banner above the cake.

This sweet little banner made a HUGE impact on the cake and Stephanie absolutely loved it!

Pro tip: Be sure to insert your candles in front of the banner so that you don't accidentally end up with a much larger flame than anticipated. You do NOT want to light your banner ablaze!

Thanks so much for stopping by today. Be sure to stop by Emma's blog to be directed to ALL the fabulous projects for today's 3D Wednesday!

I hope you were inspired!

- Veronica

As promised... the homemade frosting recipe (you'll never use another frosting again!).

Easy Vanilla Buttercream

Makes enough frosting for 2 dozen cupcakes
Source: Annie's Eats

Ingredients
20 tablespoons (2-1/2 sticks) unsalted butter
2-1/2 cups confectioner's sugar
1/8 tablespoon salt
2 teaspoons vanilla extract
2 tablespoons heavy cream

Directions
Beat butter at medium-high speed until smooth. Add sugar and salt and beat at medium-low speed, scraping down sides of bowl. Add vanilla and heavy cream and beat at medium speed until fully incorporated. Increase speed to medium-high until light and fluffy.

...want chocolate frosting? Add some cocoa to the mix! *wink*

17 August 2012

MCT 19th Edition Release Blog Hop: Sweet Treats

by Veronica

It's finally here! The 19th Edition is officially released over at My Creative Time today! If you've hopped here from Trell's blog, you are certainly on the right track! If not, click on over to Emma's blog to start this Hop from the beginning (you WON'T be sorry - promise!).

Click image for larger view
Today I created a little treat holder for my "Sweet". This holder is really easy to make - only using ONE piece of card stock (plus your extra card stock for embellishing). Inside my little holder are two Andes mints (or, Andes Mountains as I call them *giggle*). I'm sure a Ghirardelli chocolate square would fit inside, too (perhaps some minor size adjustments?).

I cut my orange card stock at 4.5" x 6". I then scored at 1.75" on both ends of the long side. After centering my candies in the middle area of the scored card stock, I folded on the scored lines and taped it shut. This left me with two open ends. I taped the two open ends shut and used my paper crimper to get the wavy edge-effect. The crimping helps to keep the ends shut, too. This easy holder would be GREAT for a classroom of kids!

Click image for larger view
Now comes the fun part! I stamped the little bat from Treats For My Sweet in Versamark randomly on the green layer. After stamping and embossing the sentiment (from the same set) on the white card stock, I used my scissors to 'rough up' the edges a bit. Most of the layers are popped up (of course!).

If you've visited my blog before, you probably recognize the awesome green striped ribbon. I use this ribbon for everything from Christmas to my wedding album to Halloween! It's so versatile! It was found at Hobby Lobby a while ago and I'm always sure to stock up on it when I find it on the shelves (...and my Mom stocks up for me, too! Thanks, Mom!).


***BLOG HOP GIVEWAY ALERT***

For our Blog Hop giveaway, there will be 2 winners chosen from ALL the comments combined!

1st Prize: Guest Design spot for the September My Creative Time Release

2nd Prize: $50 worth of My Creative Time product - YOUR CHOICE!

How to enter to win: Just leave a comment here along with the rest of the design team's blogs AND also leave a way for us to contact you!  Emma will use random.org to pick the lucky winners!  The more blogs you comment on, the more chances to win! The deadline is Sunday, August 19th at midnight! EASY PEASY!!! GOOD LUCK!

Thanks so much for hopping with the My Creative Time Design Team today. I'm your last stop.

I hope you were inspired!

- Veronica

16 August 2012

MCT 19th Edition Sneak Peek: Angel Word

by Veronica

Click image for larger view
At the end of each year, my Bible study girls and I each choose an "Angel Word" to start the new year. The Angel Word is meant to be something that we think about for the coming year and apply to our lives. It's become a great tradition that we all look forward to.

My word for 2012 is Flexibility and it's AMAZING how much this word has come to play in my life. I chose my word (remember, this is by random draw) in mid-December and started my weight-loss/healthy living journey in January. I had no idea in December that I would be choosing to live a healthier lifestyle very soon. I've become flexible in my food choices and physically flexible as well! I've also decided to 'live my life as a blessing to others" and be flexible with my schedule so that I can be more available to help my friends and family.

Usually, we just pick words out of a bowl. We get to see our words as we choose them and then share our words with the group. I thought it would be nice to have a special way to receive our words and open them all together.

Click image for larger view
For my project, I used the new My Creative Time 3x3 Fancy Envelope Die. After cutting my envelope in gold card stock, I stamped the champagne glass from Keepin' It Classy twice and embossed it in clear - just so it stands out a little on the gold card stock. I created a 'belly band' using white card stock and popped up a silver layer with the "Happy New Year" sentiment from the new Card Sentiments set. I embossed the sentiment in white.

After adding my belly band, I stickled little champagne bubbles above the glasses and a bit onto the belly band. I printed the Angel Word using the Print Clearly and Affair fonts.


Sneak Peek Giveaway Time!

With all of our Sneak Peek weeks, Emma likes to do some FUN giveaways!

***All you have to do is leave comments on our blogs! You do NOT have to comment on every blog, BUT if you do, you will just have more chances to win!

***SPREAD THE WORD TO THE WORLD ON FACEBOOK about this release & whatever connections you may have! Let us know on My Creative Time's Facebook page that you did so! OR you can just tag MCT in your post!

Emma will randomly pick & announce all winners on Friday, August 17th during the blog hop release happening @ 12:01am PST in her video! GOOD LUCK!

Log onto to your Facebook now & let start spreading word!

Thanks so much for stopping by today! I'll be back again later this week for another Sneak Peek!

I hope you were inspired!

- Veronica

14 August 2012

MCT 19th Edition Sneak Peek: Tree-mendous Wishes!

by Veronica

This week, Emma and the My Creative Time Design Team are celebrating the upcoming 19th Edition Release with great Sneak Peeks!

Click image for larger view
Today, I'm showcasing It's A Magical Season. I've seen beautiful ribbon trees in retail stores during the holiday season and wanted to try one of my own - on a much smaller scale.

The tree itself is only about four inches tall. Its 'pot' is the little bucket that they serve the desserts in at Logan's Roadhouse (I knew I kept those little pails for a reason...). Since I didn't have any Styrofoam trees in the right size, I simply cut a triangle out of card stock, wrapped it into a cone shape and used sticky tape to secure it.

Each little piece of ribbon was cut at about two inches long and hot glued into a little tab. I then used my hot glue gun to adhere each tab individually to the tree. After I finished attaching the ribbon tabs, I topped the tree with a big green bow.

Click image for larger view
The "Tree-mendous Wishes" sentiment from It's A Magical Season was stamped onto the largest tag die from Teeny Tag Greetings.


Sneak Peek Giveaway Time!

With all of our Sneak Peek weeks, Emma likes to do some FUN giveaways!

***All you have to do is leave comments on our blogs! You do NOT have to comment on every blog, BUT if you do, you will just have more chances to win!

***SPREAD THE WORD TO THE WORLD ON FACEBOOK about this release & whatever connections you may have! Let us know on My Creative Time's Facebook page that you did so! OR you can just tag MCT in your post!

Emma will randomly pick & announce all winners on Friday, August 17th during the blog hop release happening @ 12:01am PST in her video! GOOD LUCK!

Log onto to your Facebook now & let start spreading word!

Thanks so much for stopping by today! I'll be back again later this week for another Sneak Peek!

I hope you were inspired!

- Veronica

20 July 2012

Summer Bouquet

by Veronica


Happy Friday! I'm so happy to be Guest Designing for Everyday Cricut AND My Creative Time. Since I have created two separate projects for today's Guest Designer spots, I've posted them separately. You can click here to view my post for My Creative Time.

Being married to a Crafter/HGTV fanatic has taught my husband to expect the decor around our home to change...often. And while he's used to finding new knickknacks around the house, he doesn't always love them the way that I do.

Several months ago, I found a tutorial on painting/distressing ceramic tabletop items. I loved the look and decided to give it a try with a find from my favorite store (Salvation Army). As I was adding faux grass to my urn, I looked up from my project to the TV (I was watching HGTV, of course), and what do you know? I see almost the EXACT same urn on the television! It was uncanny!

The photo on the left was taken of my television screen. The photo on the right  is my urn.
I was so proud of my urn when it was completed. I couldn't wait to show my husband! His reaction was less than satisfactory...

Click photo for larger view
Though he likes the urn itself, he hates the grass. *giggle* I've been adding different floral arrangements to the urn throughout the seasons and now that it's Summertime, I put the grass back in (...it's seasonal!). Since I know The Hubs isn't a fan of the plain ol' grass, I've added a new Summer Bouquet to the grass using my Cricut!

The flowers were cut from the DCWV Spring Fling Premium Paper Stack using the Accent Essentials Cricut Cartridge. For the word "Summer", I used the same papers and the Stretch Your Imagination Cricut Cartridge.

All of the layers of the flowers are pop-dotted to give a lot of dimension! A kabob skewer is attached to the back of each flower and the Summer word and then stuck into the floral foam sitting in the urn below the faux grass.

Click photo for larger view
This project could easily be done for each season and individual holidays, too! I could cover the urn with Buffalo Batt and add snowflakes for Winter. Or keep the grass and add bunnies for Easter!

Here's a close-up of the flowers. You can see that each one is made up of several layers!

Thank you so much for joining me this week as I Guest Designed for Everyday Cricut! I've had so much fun getting creative with my Cricut and sharing it with you all!

I hope you were inspired!

- Veronica

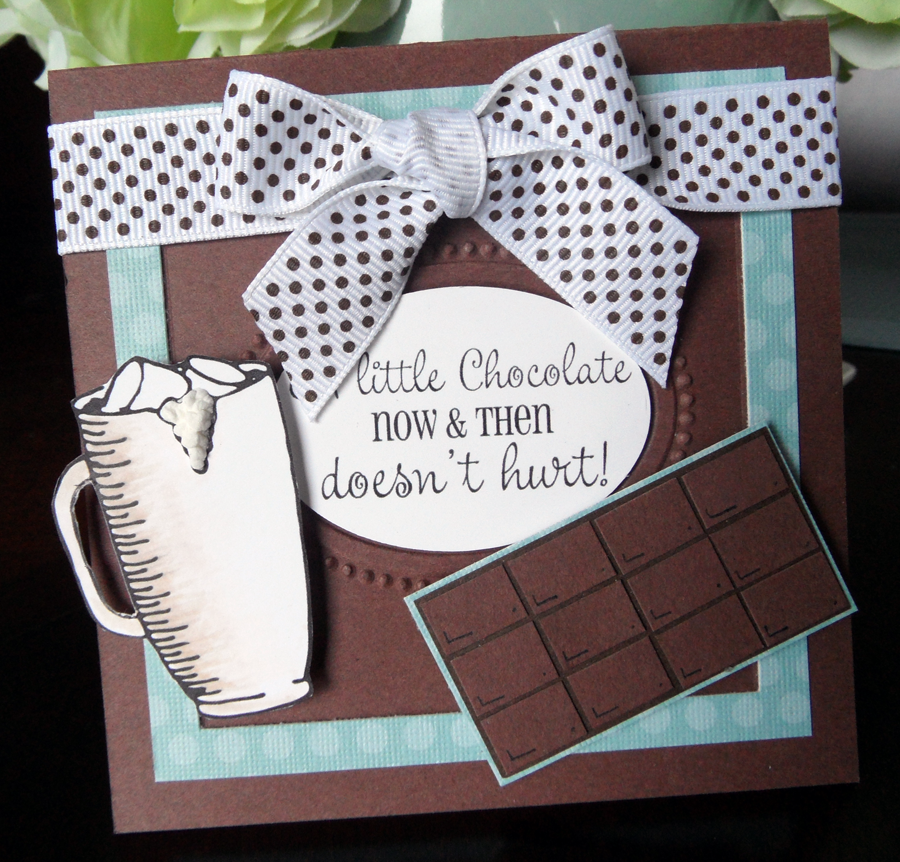
A Little Chocolate Now & Then...

by Veronica

I'm lucky enough to be Guest Designing for Emma at My Creative Time AND Everyday Cricut today. This project was created for My Creative Time. You can click here to see my post for Everyday Cricut.

Click photo for larger view
Today's project is a sweet little 4x4 card I made to add to my stash of cards to give to The Hubs when he leaves on work trips or I leave for Scrap Camp. He LOVES chocolate, so the sentiment on this card is perfect for him!

After cutting my card base, I ran it through my Big Shot with one of the frames from the Stampin' Up! Designer Frames Textured Impressions Embossing Folders Set. I then layered my blue patterned paper (which I cut into a square frame) on top of the card base. The adorable sentiment and hot chocolate mug are from the Do The Cocoa Motion Stamp Set.

I shaded the cocoa mug with my Copics and added Marvy Uchida Liquid Applique to the foam spilling out of the top.

Liquid Applique comes in a tube (similar to a glue pen). After applying it to my project, I heated it with my heat tool and it puffed up to look like foam. This product is great for fur, frosting, snow and whipped cream!

I created the chocolate bar on my own using my paper trimmer and a black fine point marker for the corner marks. After tying my cute polka dot ribbon around the card, it was good to go!

Great News: STARTING TODAY, you can shop at the My Creative Time Online Store and SAVE 20% off your entire order using code: THANKU

This Customer Appreciation Sale is only good until Sunday, July 22nd, so be sure to get your orders in this weekend!

I hope you were inspired!

- Veronica

19 July 2012

Mickey's House

by Veronica

Whenever I go to our semi-annual "Scrap Camp" with the gals in my family, I notice that my sisters-in-law, Mom and Grandma usually have several pages done while I'm still working on my first. Of course, the fact that I do more chatting than scrapping comes in to play here, but even when I am being productive, it just seems to take me much longer to finish a page than the rest of the girls.

This is why. *giggle*

Back in October 2010, my husband and I were lucky enough to be gifted my grandparents timeshare in Florida. Since we were as close to Disney World as we'd be for a long while, we decided to 'drop in' and visit Mickey and Friends for a couple of day trips.

We had a lot of fun touring Mickey's house! It's so neat that you can actually go inside and see how he actually lives! *giggle*

This layout uses Mickey's house, grass, walkway and clouds from the Disney Mickey & Friends Cricut Cartridge. I used several solid and glittered card stock to really make the layers come to life. Several layers are popped up to add dimension. I used my white gel pen to doodle on the trim and columns.

Since we were visiting Mickey in the Fall, the gang was hosting a Pumpkin Contest and several Mickey Mouse Pumpkins were growing in his yard. I placed the photos of Mickey's backyard behind the paper house to give the illusion of them growing on the page.

Of course, I wanted to share photos of Mickey's house in my scrapbook, too. But I didn't want to take away from the 'house' page. Since I had several photos to share, but not all of them were super important, I decided to layer them and make a collage. This technique wouldn't work for all topics/photos, but it certainly does the trick here.

You'll notice that all of my photos have a white trim. This is on the photos themselves. Did you know that when having your photos printed, you can usually choose to have a border put on them? I think the white border gives the photos a more 'professional' feel and I really love the look.

Thanks so much for stopping by today! I'm looking forward to sharing my last Cricut project for my Guest Designer Week at Everyday Cricut with you tomorrow.

I hope you were inspired!

- Veronica